By use · projects and resources

Workshop shed: plan the work zone first

Start with the task at the bench, then reserve standing, staging and movement space. A small dedicated workshop and a larger room shared with a mower have different operating sequences.

Different ways to solve the task

Dedicated bench workspace

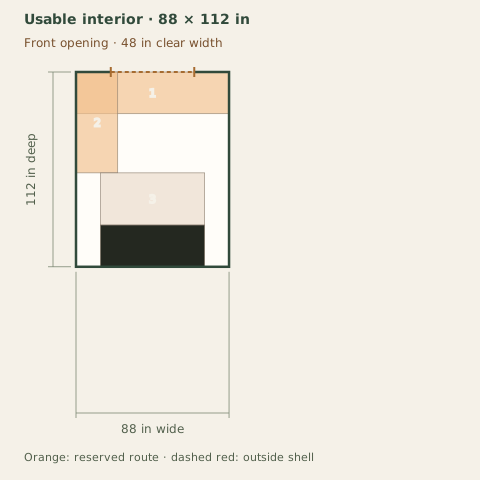
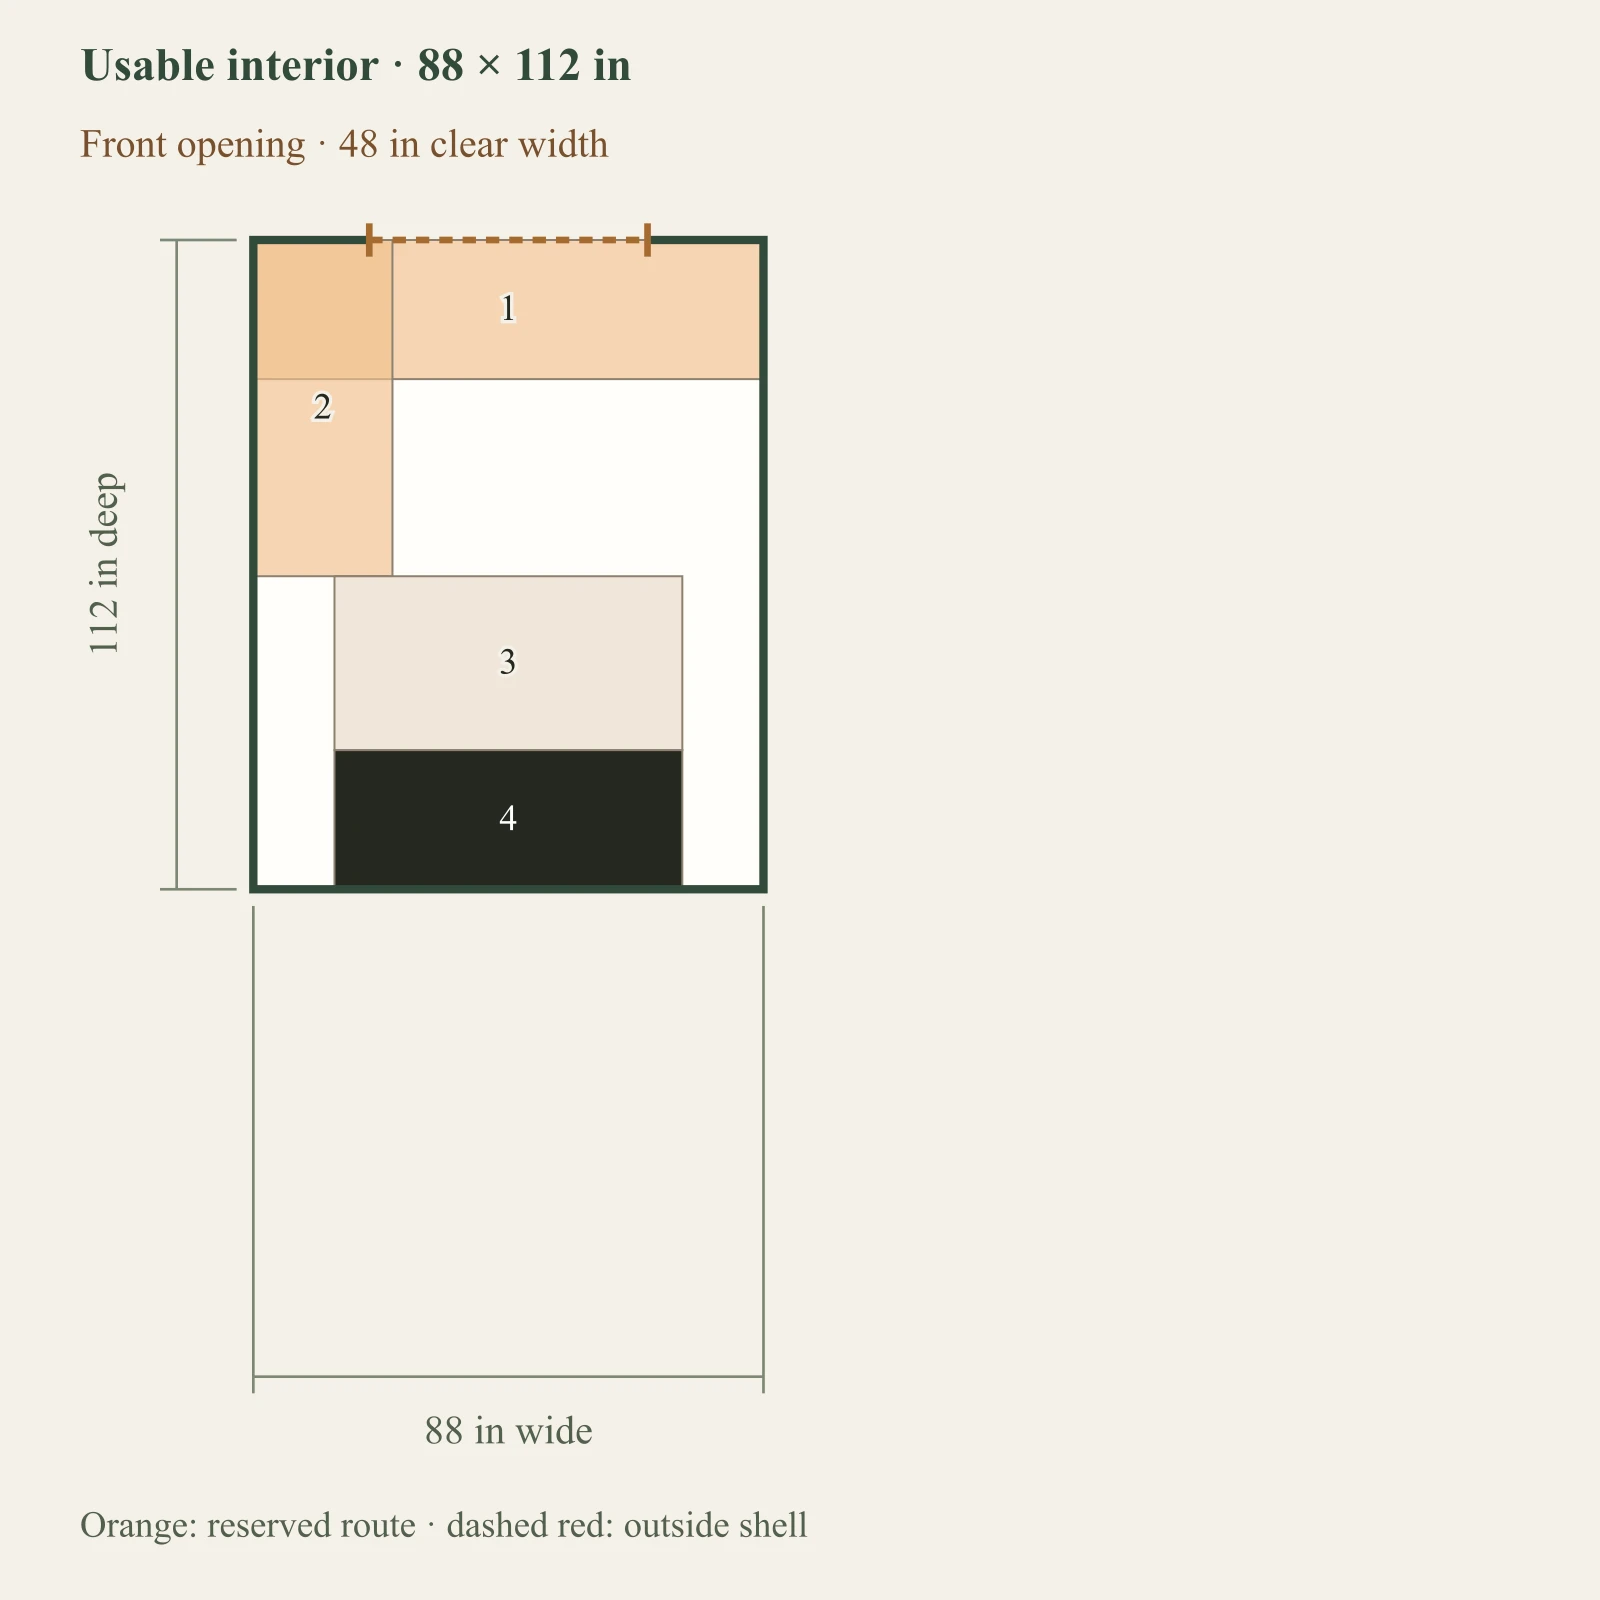
P05 centers a 60×24 in bench in an authored 8×10 shell, with separate standing and entrance reservations.

Shared storage and work

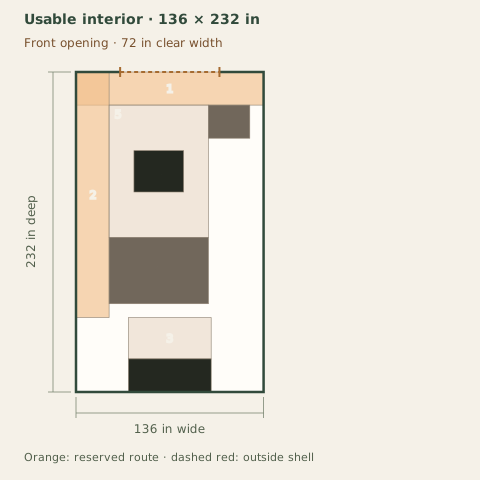
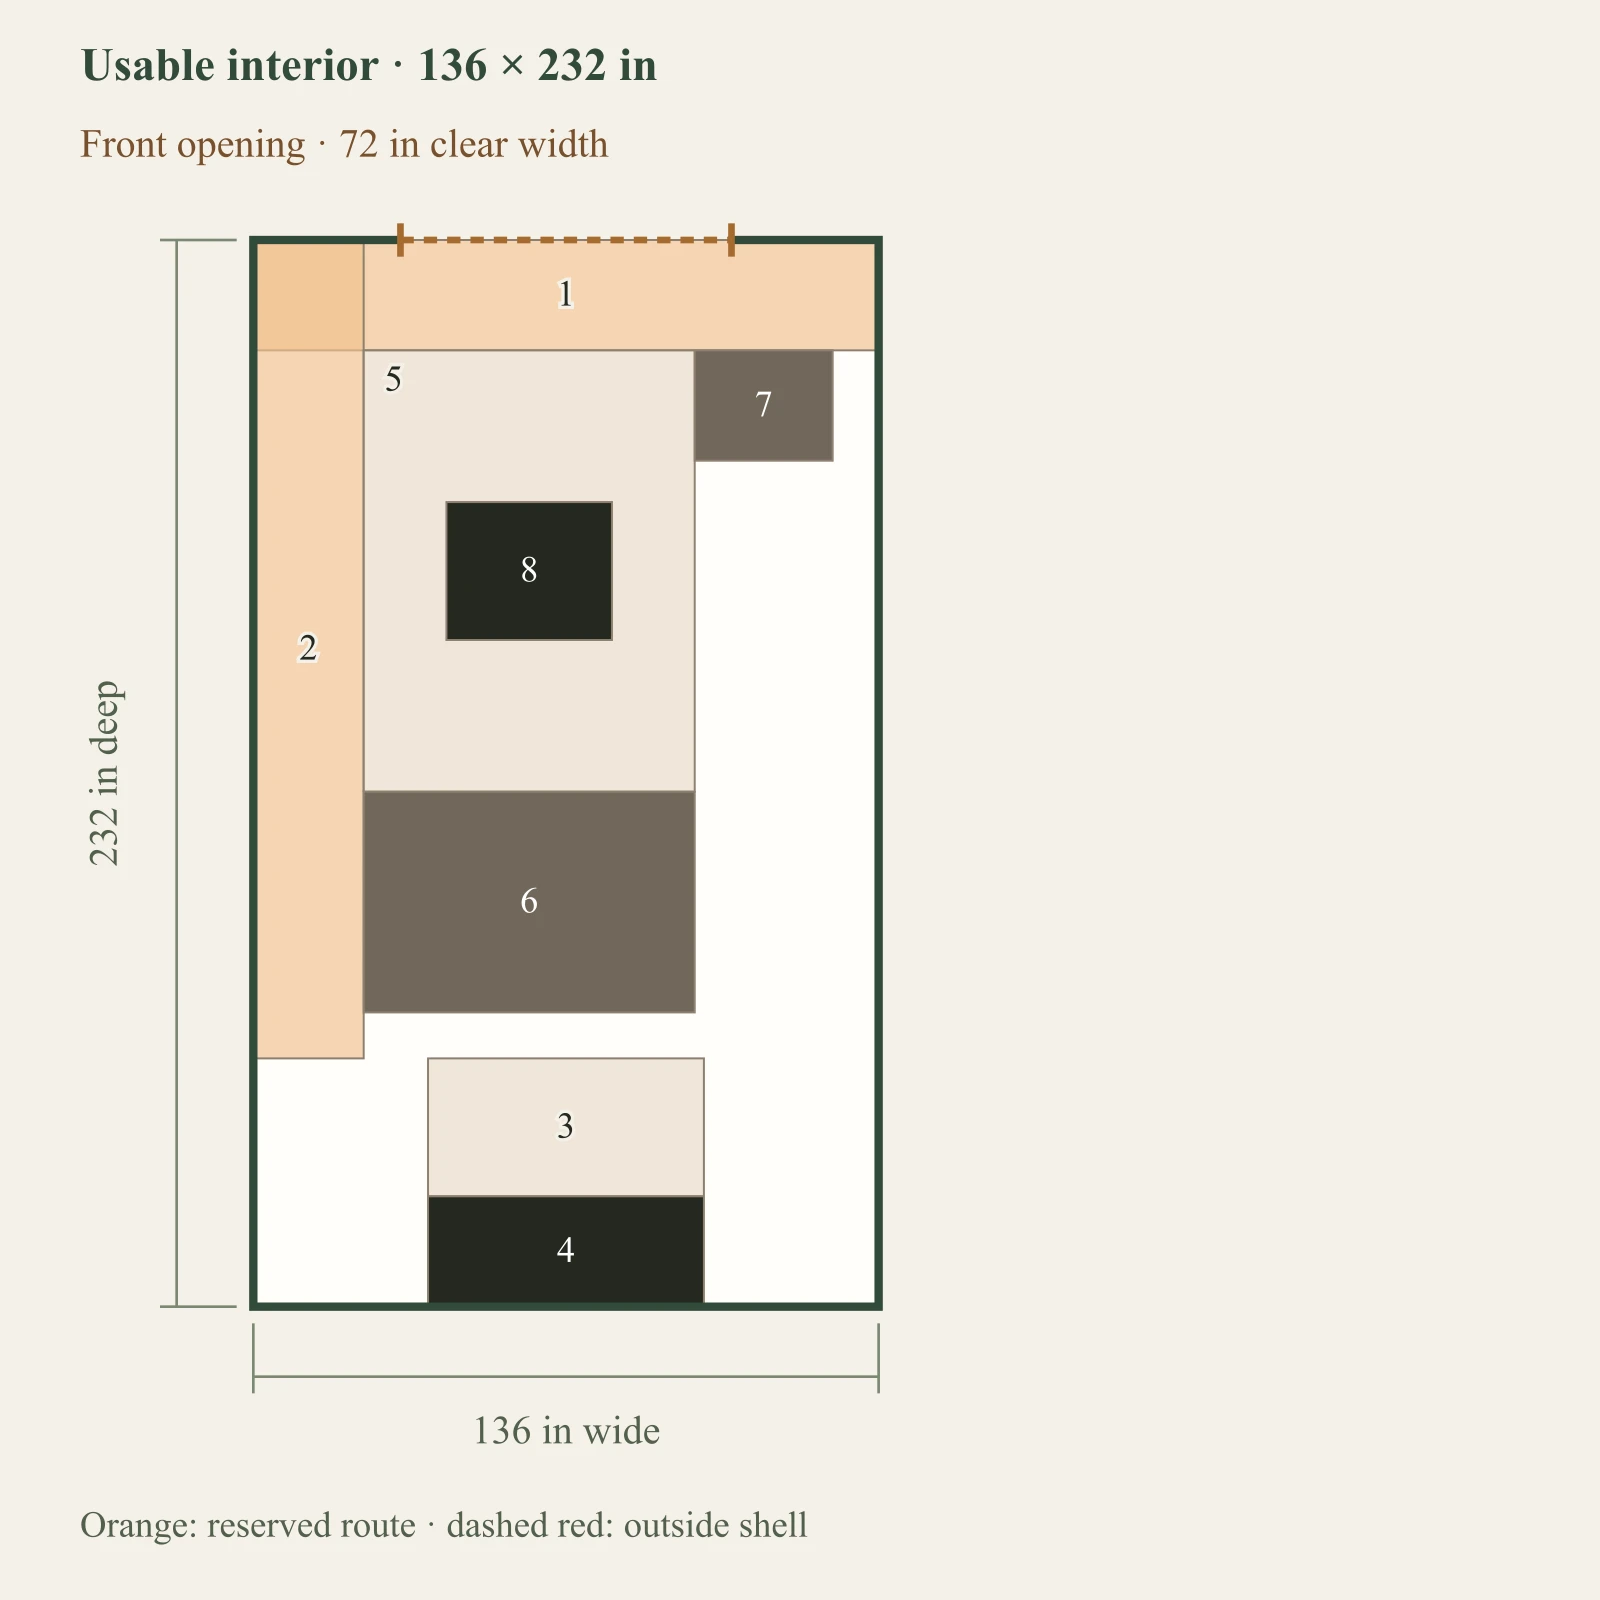
P02 combines equipment storage and a rear workbench. The mower must leave before work starts; open floor is not a verified machine envelope.

2 published project studies

Confirm the conditions that change your choice

Check each machine manual, actual stock lengths, material turns, power and dust handling. These layouts screen space; they do not specify safe machine operating clearances.

Check what the plan package includes →
Optional: compare editable layouts and your measurements

These tools use your private saved project. Browsing examples does not adopt them. Open a project study to explicitly adopt supported inputs.

Start with a useful arrangement

Ways to use the space.

Compare what each layout makes room for and what it leaves out. These are dimensioned planning layouts you can adapt, with dimensions and assumptions shown before you enter anything.

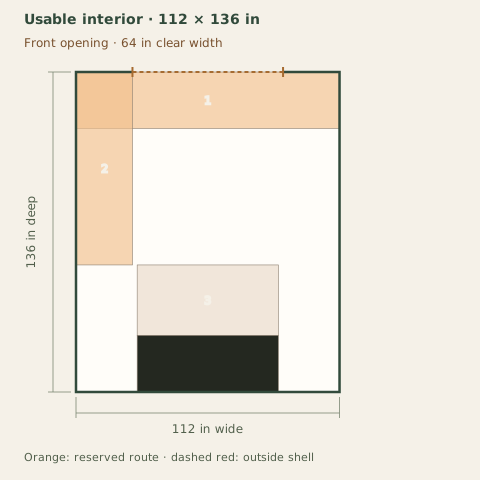
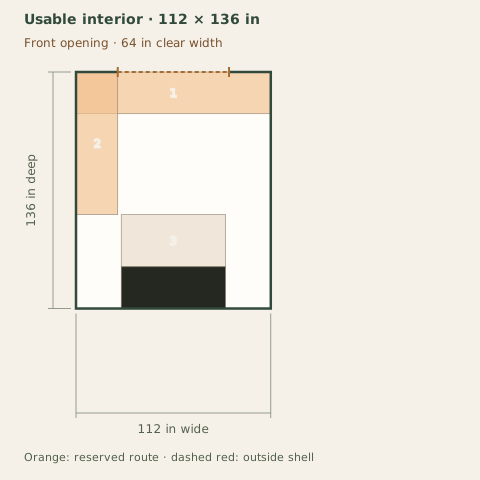
Example layout · 10×12

A bench-led repair space

Small repair and craft projects with a clear surface to work on.

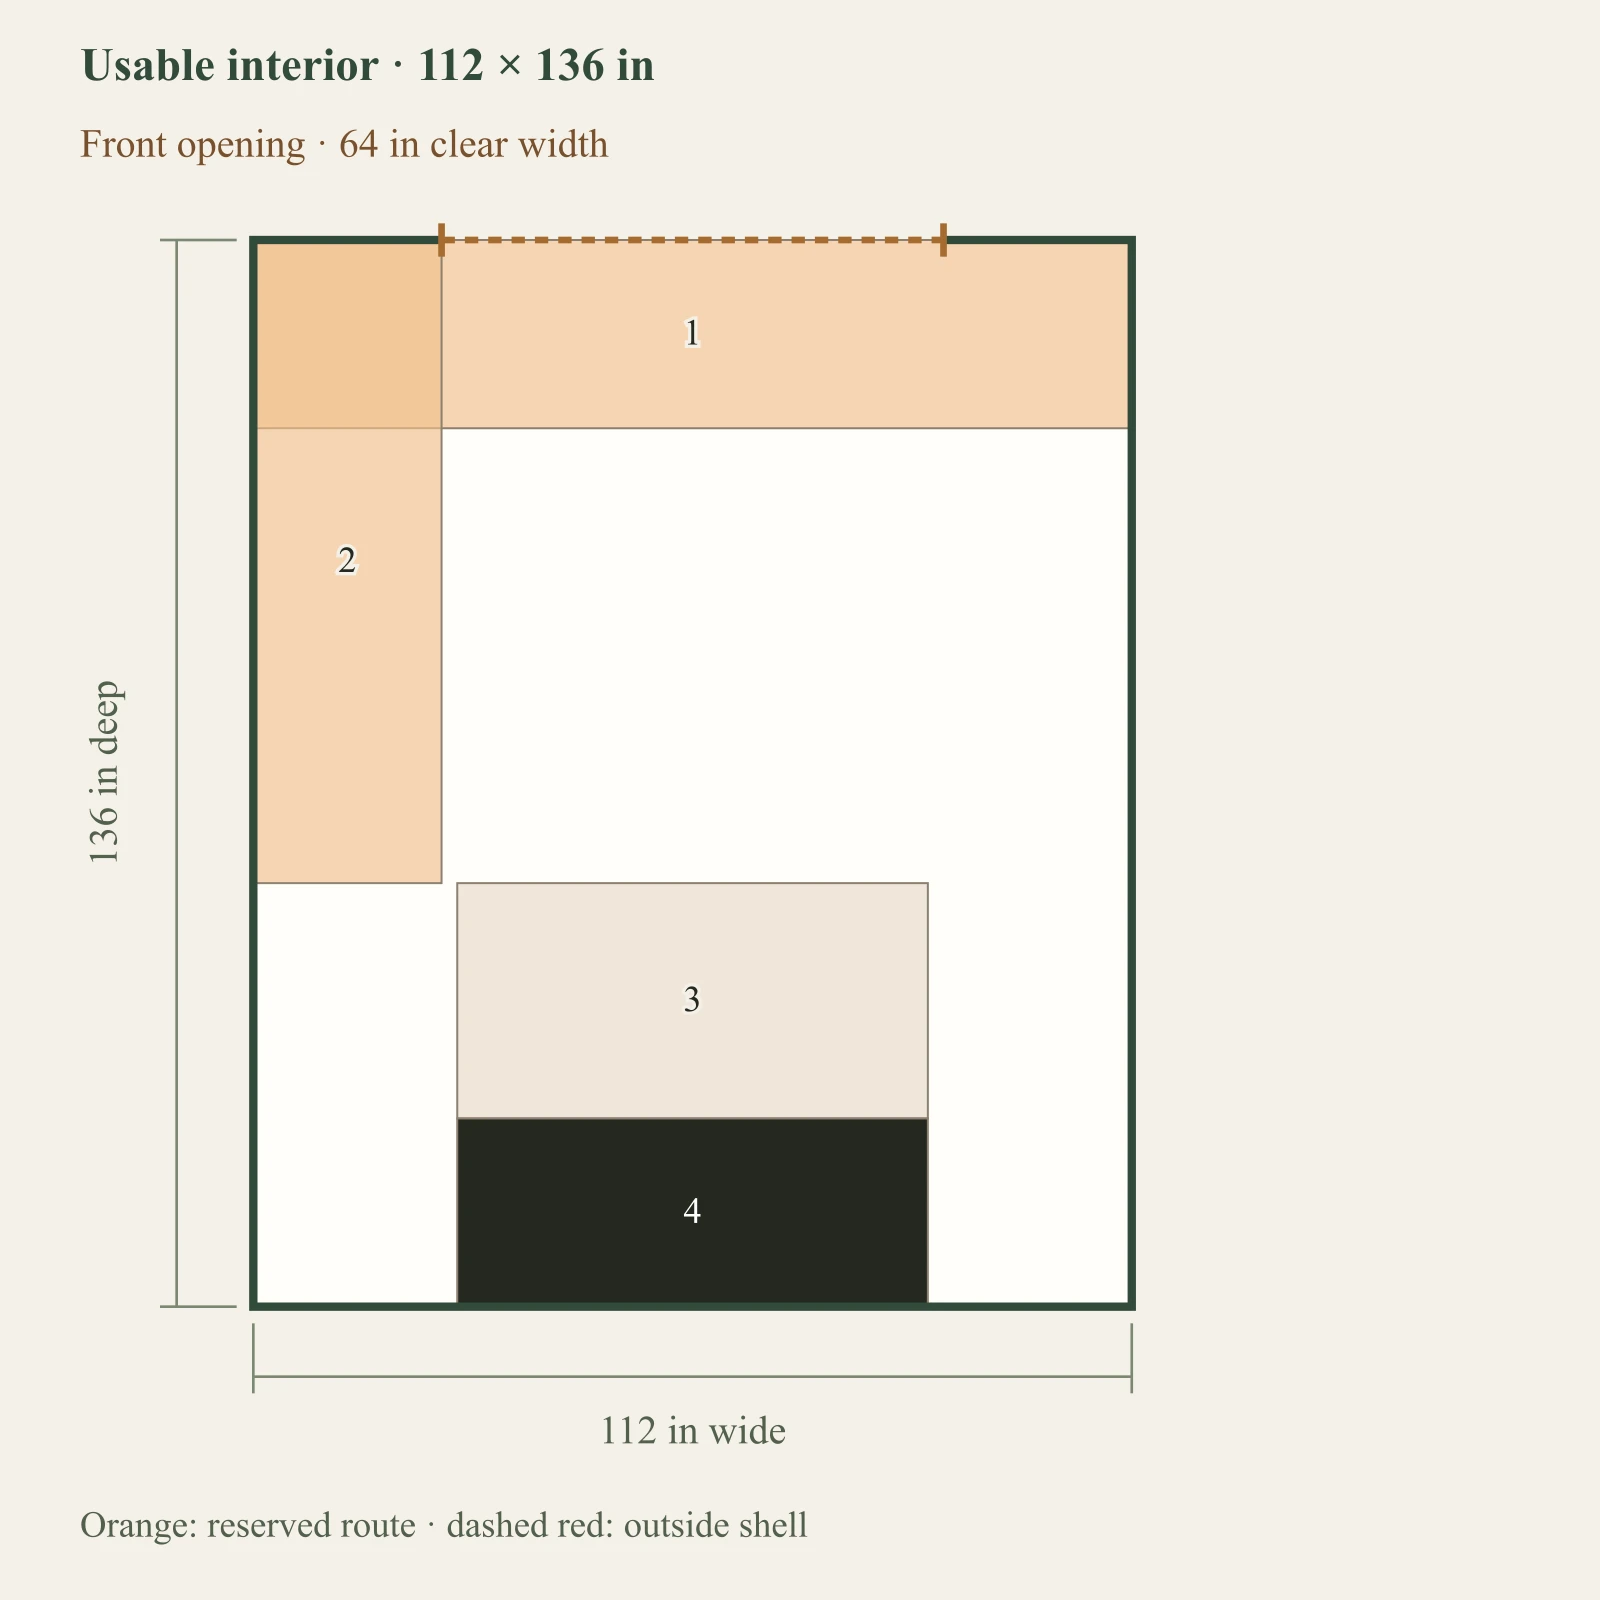
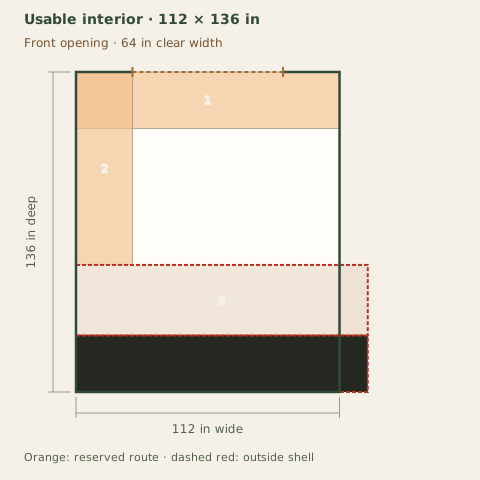
Full-size layout and reserved spacesFull-size footprints with a 24 in entry/side aisle and 30 in bench standing depth. Each mobile deployment and its orthogonal routes are tested with other parked positions unchanged. Staging is screened along the lengthwise axis; turning, actual machine feed points and manufacturer operating instructions require separate confirmation. Objects outside the outlined shell have not been placed. Numbers refer to the object list. This is a planning diagram, not a construction drawing.Reserved entry cross-aisle: 112 × 24 in at 0, 0 inReserved side aisle: 24 × 82 in at 0, 0 inBench standing area: 60 × 30 in at 26, 82 inWorkbench: 60 × 24 in at 26, 112 in1234Usable interior · 112 × 136 inFront opening · 64 in clear width112 in wide136 in deepOrange: reserved route · dashed red: outside shell

Dark: equipment or storage. Pale areas: activities or zones. Dimensions in inches; scale changes with the view.

  1. 1. Reserved entry cross-aisle: 112 × 24 in
  2. 2. Reserved side aisle: 24 × 82 in
  3. 3. Bench standing area: 60 × 30 in
  4. 4. Workbench: 60 × 24 in

Inspect the layout

100%

Dimensions in inches. Zoom changes the view, not your measurements. Select an object to identify its footprint, then swipe or scroll within the drawing. With a keyboard, focus the drawing and use arrow keys.

Input-based planning only. Turning, ramps, thresholds, wall mounting and structural capacity are not approved by this diagram. Escape or Close returns to the page.

The shown arrangement preserves its reserved spaces and entry aisle.

What you gain
Keeps the rear bench and standing area together, with a reserved route from the entrance.
What you give up
This reference does not reserve operating space for a floor machine. Adding one requires another check.
When to choose it
Choose this direction when the work surface matters more than permanently stationed machinery.

Example interior: 112 × 136 in. Opening: 64 in wide. All reference dimensions and allowances are planning assumptions, not product specifications.

Checks and operating states
  • A failed arrangement is not proof that every layout in this size fails. Only the displayed axis-aligned arrangements were tested.
  • Equipment footprints and reserved spaces are editable planning assumptions. These rectangles do not establish manufacturer operating clearances.
  • Mobile transport tests full-footprint translations along obstacle edges without rotation. Individual workstation approaches and turning remain unassessed. Machine-specific material feeding is not selected; enable its separate straight-sweep check when relevant.
  • Confirm guarding, electrical, dust collection, ventilation, fire separation, loading, and local requirements separately.

Before buying or building: Bring your bench dimensions, longest material and tool list to the supplier; confirm the actual door, interior and services.

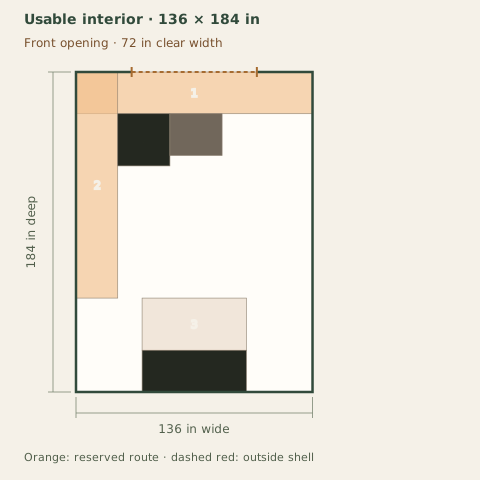
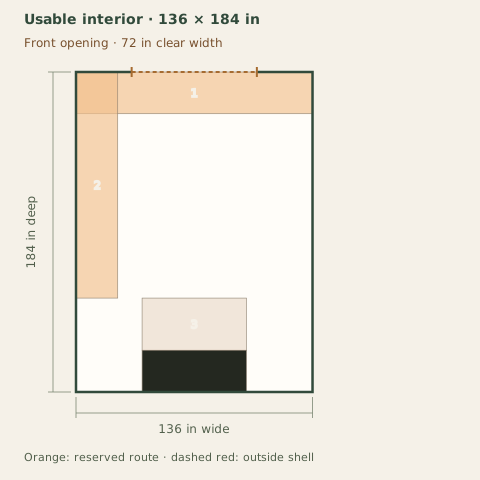
Example layout · 12×16

A mobile-tool workshop

Projects that use a movable tool and then put it away.

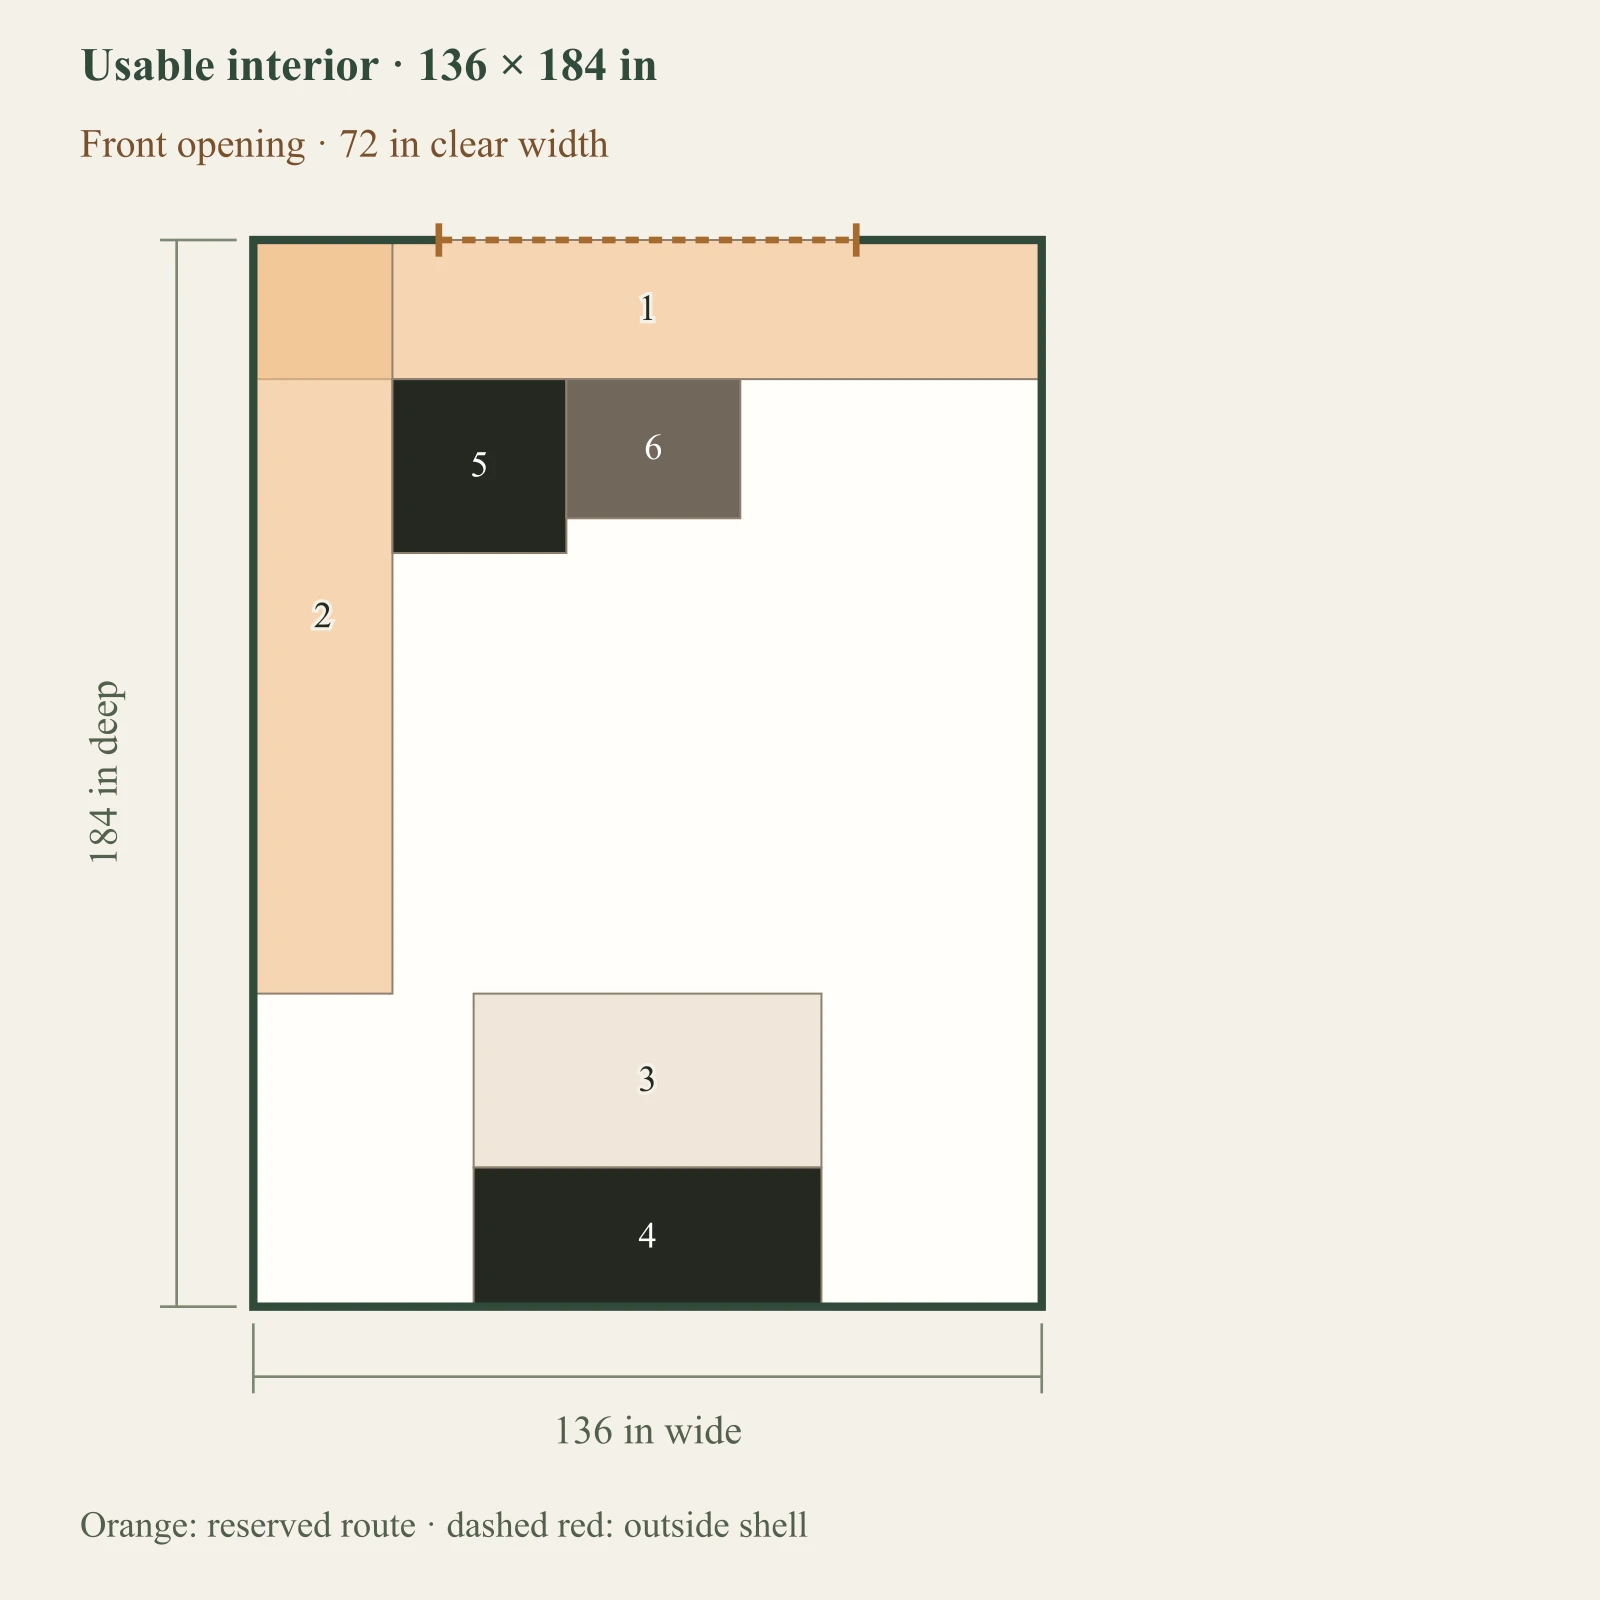
Full-size layout and reserved spacesFull-size footprints with a 24 in entry/side aisle and 30 in bench standing depth. Each mobile deployment and its orthogonal routes are tested with other parked positions unchanged. Staging is screened along the lengthwise axis; turning, actual machine feed points and manufacturer operating instructions require separate confirmation. Objects outside the outlined shell have not been placed. Numbers refer to the object list. This is a planning diagram, not a construction drawing.Reserved entry cross-aisle: 136 × 24 in at 0, 0 inReserved side aisle: 24 × 130 in at 0, 0 inBench standing area: 60 × 30 in at 38, 130 inWorkbench: 60 × 24 in at 38, 160 inMobile tool parked footprint: 30 × 30 in at 24, 24 inTool chest: 30 × 24 in at 54, 24 in123456Usable interior · 136 × 184 inFront opening · 72 in clear width136 in wide184 in deepOrange: reserved route · dashed red: outside shell

Dark: equipment or storage. Pale areas: activities or zones. Dimensions in inches; scale changes with the view.

  1. 1. Reserved entry cross-aisle: 136 × 24 in
  2. 2. Reserved side aisle: 24 × 130 in
  3. 3. Bench standing area: 60 × 30 in
  4. 4. Workbench: 60 × 24 in
  5. 5. Mobile tool parked footprint: 30 × 30 in
  6. 6. Tool chest: 30 × 24 in

Inspect the layout

100%

Dimensions in inches. Zoom changes the view, not your measurements. Select an object to identify its footprint, then swipe or scroll within the drawing. With a keyboard, focus the drawing and use arrow keys.

Input-based planning only. Turning, ramps, thresholds, wall mounting and structural capacity are not approved by this diagram. Escape or Close returns to the page.

The shown arrangement preserves its reserved spaces and entry aisle.

What you gain
Tests the parked tool and its separate deployed envelope while the other fixtures stay in place.
What you give up
Moving the tool is an extra step. The shown translation route is tested without rotation; actual steering and tool-specific feeding still need checking.
When to choose it
Choose this direction if you accept setup time in exchange for a shared floor area.

Example interior: 136 × 184 in. Opening: 72 in wide. All reference dimensions and allowances are planning assumptions, not product specifications.

Checks and operating states
  • A failed arrangement is not proof that every layout in this size fails. Only the displayed axis-aligned arrangements were tested.
  • Equipment footprints and reserved spaces are editable planning assumptions. These rectangles do not establish manufacturer operating clearances.
  • Mobile transport tests full-footprint translations along obstacle edges without rotation. Individual workstation approaches and turning remain unassessed. Machine-specific material feeding is not selected; enable its separate straight-sweep check when relevant.
  • Confirm guarding, electrical, dust collection, ventilation, fire separation, loading, and local requirements separately.

Move Mobile tool from parked to working position

Move Mobile tool from parked to working positionFull-size footprints with a 24 in entry/side aisle and 30 in bench standing depth. Each mobile deployment and its orthogonal routes are tested with other parked positions unchanged. Staging is screened along the lengthwise axis; turning, actual machine feed points and manufacturer operating instructions require separate confirmation. Objects outside the outlined shell have not been placed. Numbers refer to the object list. This is a planning diagram, not a construction drawing.Full-footprint translation sweep: 30 × 136 in at 24, 24 inFull-footprint translation sweep: 99 × 30 in at 24, 130 inFull-footprint translation sweep: 30 × 127 in at 93, 33 inReserved entry cross-aisle: 136 × 24 in at 0, 0 inReserved side aisle: 24 × 130 in at 0, 0 inBench standing area: 60 × 30 in at 38, 130 inWorkbench: 60 × 24 in at 38, 160 inTool chest: 30 × 24 in at 54, 24 inMobile tool parked footprint: 30 × 30 in at 24, 24 in123456789Usable interior · 136 × 184 inFront opening · 72 in clear width136 in wide184 in deepOrange: reserved route · dashed red: outside shell

Dark: equipment or storage. Pale areas: activities or zones. Dimensions in inches; scale changes with the view.

  1. 1. Full-footprint translation sweep: 30 × 136 in
  2. 2. Full-footprint translation sweep: 99 × 30 in
  3. 3. Full-footprint translation sweep: 30 × 127 in
  4. 4. Reserved entry cross-aisle: 136 × 24 in
  5. 5. Reserved side aisle: 24 × 130 in
  6. 6. Bench standing area: 60 × 30 in
  7. 7. Workbench: 60 × 24 in
  8. 8. Tool chest: 30 × 24 in
  9. 9. Mobile tool parked footprint: 30 × 30 in

Inspect the layout

100%

Dimensions in inches. Zoom changes the view, not your measurements. Select an object to identify its footprint, then swipe or scroll within the drawing. With a keyboard, focus the drawing and use arrow keys.

Input-based planning only. Turning, ramps, thresholds, wall mounting and structural capacity are not approved by this diagram. Escape or Close returns to the page.

Use Mobile tool; other machines stay parked

Use Mobile tool; other machines stay parkedFull-size footprints with a 24 in entry/side aisle and 30 in bench standing depth. Each mobile deployment and its orthogonal routes are tested with other parked positions unchanged. Staging is screened along the lengthwise axis; turning, actual machine feed points and manufacturer operating instructions require separate confirmation. Objects outside the outlined shell have not been placed. Numbers refer to the object list. This is a planning diagram, not a construction drawing.Reserved entry cross-aisle: 136 × 24 in at 0, 0 inReserved side aisle: 24 × 130 in at 0, 0 inBench standing area: 60 × 30 in at 38, 130 inWorkbench: 60 × 24 in at 38, 160 inTool chest: 30 × 24 in at 54, 24 inMobile tool working envelope: 48 × 48 in at 84, 24 inMobile tool footprint: 30 × 30 in at 93, 33 in1234567Usable interior · 136 × 184 inFront opening · 72 in clear width136 in wide184 in deepOrange: reserved route · dashed red: outside shell

Dark: equipment or storage. Pale areas: activities or zones. Dimensions in inches; scale changes with the view.

  1. 1. Reserved entry cross-aisle: 136 × 24 in
  2. 2. Reserved side aisle: 24 × 130 in
  3. 3. Bench standing area: 60 × 30 in
  4. 4. Workbench: 60 × 24 in
  5. 5. Tool chest: 30 × 24 in
  6. 6. Mobile tool working envelope: 48 × 48 in
  7. 7. Mobile tool footprint: 30 × 30 in

Inspect the layout

100%

Dimensions in inches. Zoom changes the view, not your measurements. Select an object to identify its footprint, then swipe or scroll within the drawing. With a keyboard, focus the drawing and use arrow keys.

Input-based planning only. Turning, ramps, thresholds, wall mounting and structural capacity are not approved by this diagram. Escape or Close returns to the page.

Before buying or building: Measure the tool in storage and in use. Check power, dust collection and moving the real tool before committing.

Example layout · 12×20

Permanent machine and assembly zones

A workshop that keeps a saw and assembly table in place between projects.

Full-size layout and reserved spacesFull-size footprints with a 24 in entry/side aisle and 30 in bench standing depth. Machine envelopes are reserved simultaneously. Staging is screened along the lengthwise axis; turning, actual machine feed points and manufacturer operating instructions require separate confirmation. Objects outside the outlined shell have not been placed. Numbers refer to the object list. This is a planning diagram, not a construction drawing.Reserved entry cross-aisle: 136 × 24 in at 0, 0 inReserved side aisle: 24 × 178 in at 0, 0 inBench standing area: 60 × 30 in at 38, 178 inWorkbench: 60 × 24 in at 38, 208 inTable saw working envelope: 72 × 96 in at 24, 24 inAssembly table: 72 × 48 in at 24, 120 inTool chest: 30 × 24 in at 96, 24 inTable saw footprint: 36 × 30 in at 42, 57 in12345678Usable interior · 136 × 232 inFront opening · 72 in clear width136 in wide232 in deepOrange: reserved route · dashed red: outside shell

Dark: equipment or storage. Pale areas: activities or zones. Dimensions in inches; scale changes with the view.

  1. 1. Reserved entry cross-aisle: 136 × 24 in
  2. 2. Reserved side aisle: 24 × 178 in
  3. 3. Bench standing area: 60 × 30 in
  4. 4. Workbench: 60 × 24 in
  5. 5. Table saw working envelope: 72 × 96 in
  6. 6. Assembly table: 72 × 48 in
  7. 7. Tool chest: 30 × 24 in
  8. 8. Table saw footprint: 36 × 30 in

Inspect the layout

100%

Dimensions in inches. Zoom changes the view, not your measurements. Select an object to identify its footprint, then swipe or scroll within the drawing. With a keyboard, focus the drawing and use arrow keys.

Input-based planning only. Turning, ramps, thresholds, wall mounting and structural capacity are not approved by this diagram. Escape or Close returns to the page.

The shown arrangement preserves its reserved spaces and entry aisle.

What you gain
Reserves the machine envelope, assembly table, rear bench and entry aisle simultaneously, then checks the entered straight material sweep.
What you give up
The table footprint has no separate all-around assembly working allowance. The small reference material is only 18 in long; longer stock needs a new feed check.
When to choose it
Choose this direction only when your real equipment, operating allowances and material lengths preserve all required zones.

Example interior: 136 × 232 in. Opening: 72 in wide. All reference dimensions and allowances are planning assumptions, not product specifications.

Checks and operating states
  • A failed arrangement is not proof that every layout in this size fails. Only the displayed axis-aligned arrangements were tested.
  • Equipment footprints and reserved spaces are editable planning assumptions. These rectangles do not establish manufacturer operating clearances.
  • Mobile transport tests full-footprint translations along obstacle edges without rotation. Individual workstation approaches and turning remain unassessed. The straight material sweep uses the entered longest material on both sides of the tool and the entered path width. Confirm the actual feed point and manufacturer instructions.
  • Confirm guarding, electrical, dust collection, ventilation, fire separation, loading, and local requirements separately.

Straight material feed at Table saw

Straight material feed at Table sawFull-size footprints with a 24 in entry/side aisle and 30 in bench standing depth. Machine envelopes are reserved simultaneously. Staging is screened along the lengthwise axis; turning, actual machine feed points and manufacturer operating instructions require separate confirmation. Objects outside the outlined shell have not been placed. Numbers refer to the object list. This is a planning diagram, not a construction drawing.Reserved entry cross-aisle: 136 × 24 in at 0, 0 inReserved side aisle: 24 × 178 in at 0, 0 inBench standing area: 60 × 30 in at 38, 178 inWorkbench: 60 × 24 in at 38, 208 inTable saw working envelope: 72 × 96 in at 24, 24 inAssembly table: 72 × 48 in at 24, 120 inTool chest: 30 × 24 in at 96, 24 inTable saw footprint: 36 × 30 in at 42, 57 inTable saw: entered material sweep: 24 × 66 in at 48, 39 in123456789Usable interior · 136 × 232 inFront opening · 72 in clear width136 in wide232 in deepOrange: reserved route · dashed red: outside shell

Dark: equipment or storage. Pale areas: activities or zones. Dimensions in inches; scale changes with the view.

  1. 1. Reserved entry cross-aisle: 136 × 24 in
  2. 2. Reserved side aisle: 24 × 178 in
  3. 3. Bench standing area: 60 × 30 in
  4. 4. Workbench: 60 × 24 in
  5. 5. Table saw working envelope: 72 × 96 in
  6. 6. Assembly table: 72 × 48 in
  7. 7. Tool chest: 30 × 24 in
  8. 8. Table saw footprint: 36 × 30 in
  9. 9. Table saw: entered material sweep: 24 × 66 in

Inspect the layout

100%

Dimensions in inches. Zoom changes the view, not your measurements. Select an object to identify its footprint, then swipe or scroll within the drawing. With a keyboard, focus the drawing and use arrow keys.

Input-based planning only. Turning, ramps, thresholds, wall mounting and structural capacity are not approved by this diagram. Escape or Close returns to the page.

Before buying or building: Measure the assembly task as well as the furniture. Verify feed points, turning, services and equipment instructions with the supplier.

What changes when the same arrangement gets smaller?

These results keep the first reference's equipment, activities and allowances unchanged. Each shell has its own disclosed interior and door assumptions. All three drawings use the same scale. A failed arrangement does not prove every layout impossible.

8×10

Interior 88 × 112 in; door 48 in.

Full-size layout and reserved spacesFull-size footprints with a 24 in entry/side aisle and 30 in bench standing depth. Each mobile deployment and its orthogonal routes are tested with other parked positions unchanged. Staging is screened along the lengthwise axis; turning, actual machine feed points and manufacturer operating instructions require separate confirmation. Objects outside the outlined shell have not been placed. Numbers refer to the object list. This is a planning diagram, not a construction drawing.Reserved entry cross-aisle: 88 × 24 in at 0, 0 inReserved side aisle: 24 × 58 in at 0, 0 inBench standing area: 60 × 30 in at 14, 58 inWorkbench: 60 × 24 in at 14, 88 in1234Usable interior · 88 × 112 inFront opening · 48 in clear width88 in wide112 in deepOrange: reserved route · dashed red: outside shell
Object dimensions & enlarged view

Inspect the layout

100%

Dimensions in inches. Zoom changes the view, not your measurements. Select an object to identify its footprint, then swipe or scroll within the drawing. With a keyboard, focus the drawing and use arrow keys.

Input-based planning only. Turning, ramps, thresholds, wall mounting and structural capacity are not approved by this diagram. Escape or Close returns to the page.

  • 1. Reserved entry cross-aisle: 88 × 24 in
  • 2. Reserved side aisle: 24 × 58 in
  • 3. Bench standing area: 60 × 30 in
  • 4. Workbench: 60 × 24 in

Shown geometry passes

A failed arrangement is not proof that every layout in this size fails. Only the displayed axis-aligned arrangements were tested.

10×12

Interior 112 × 136 in; door 64 in.

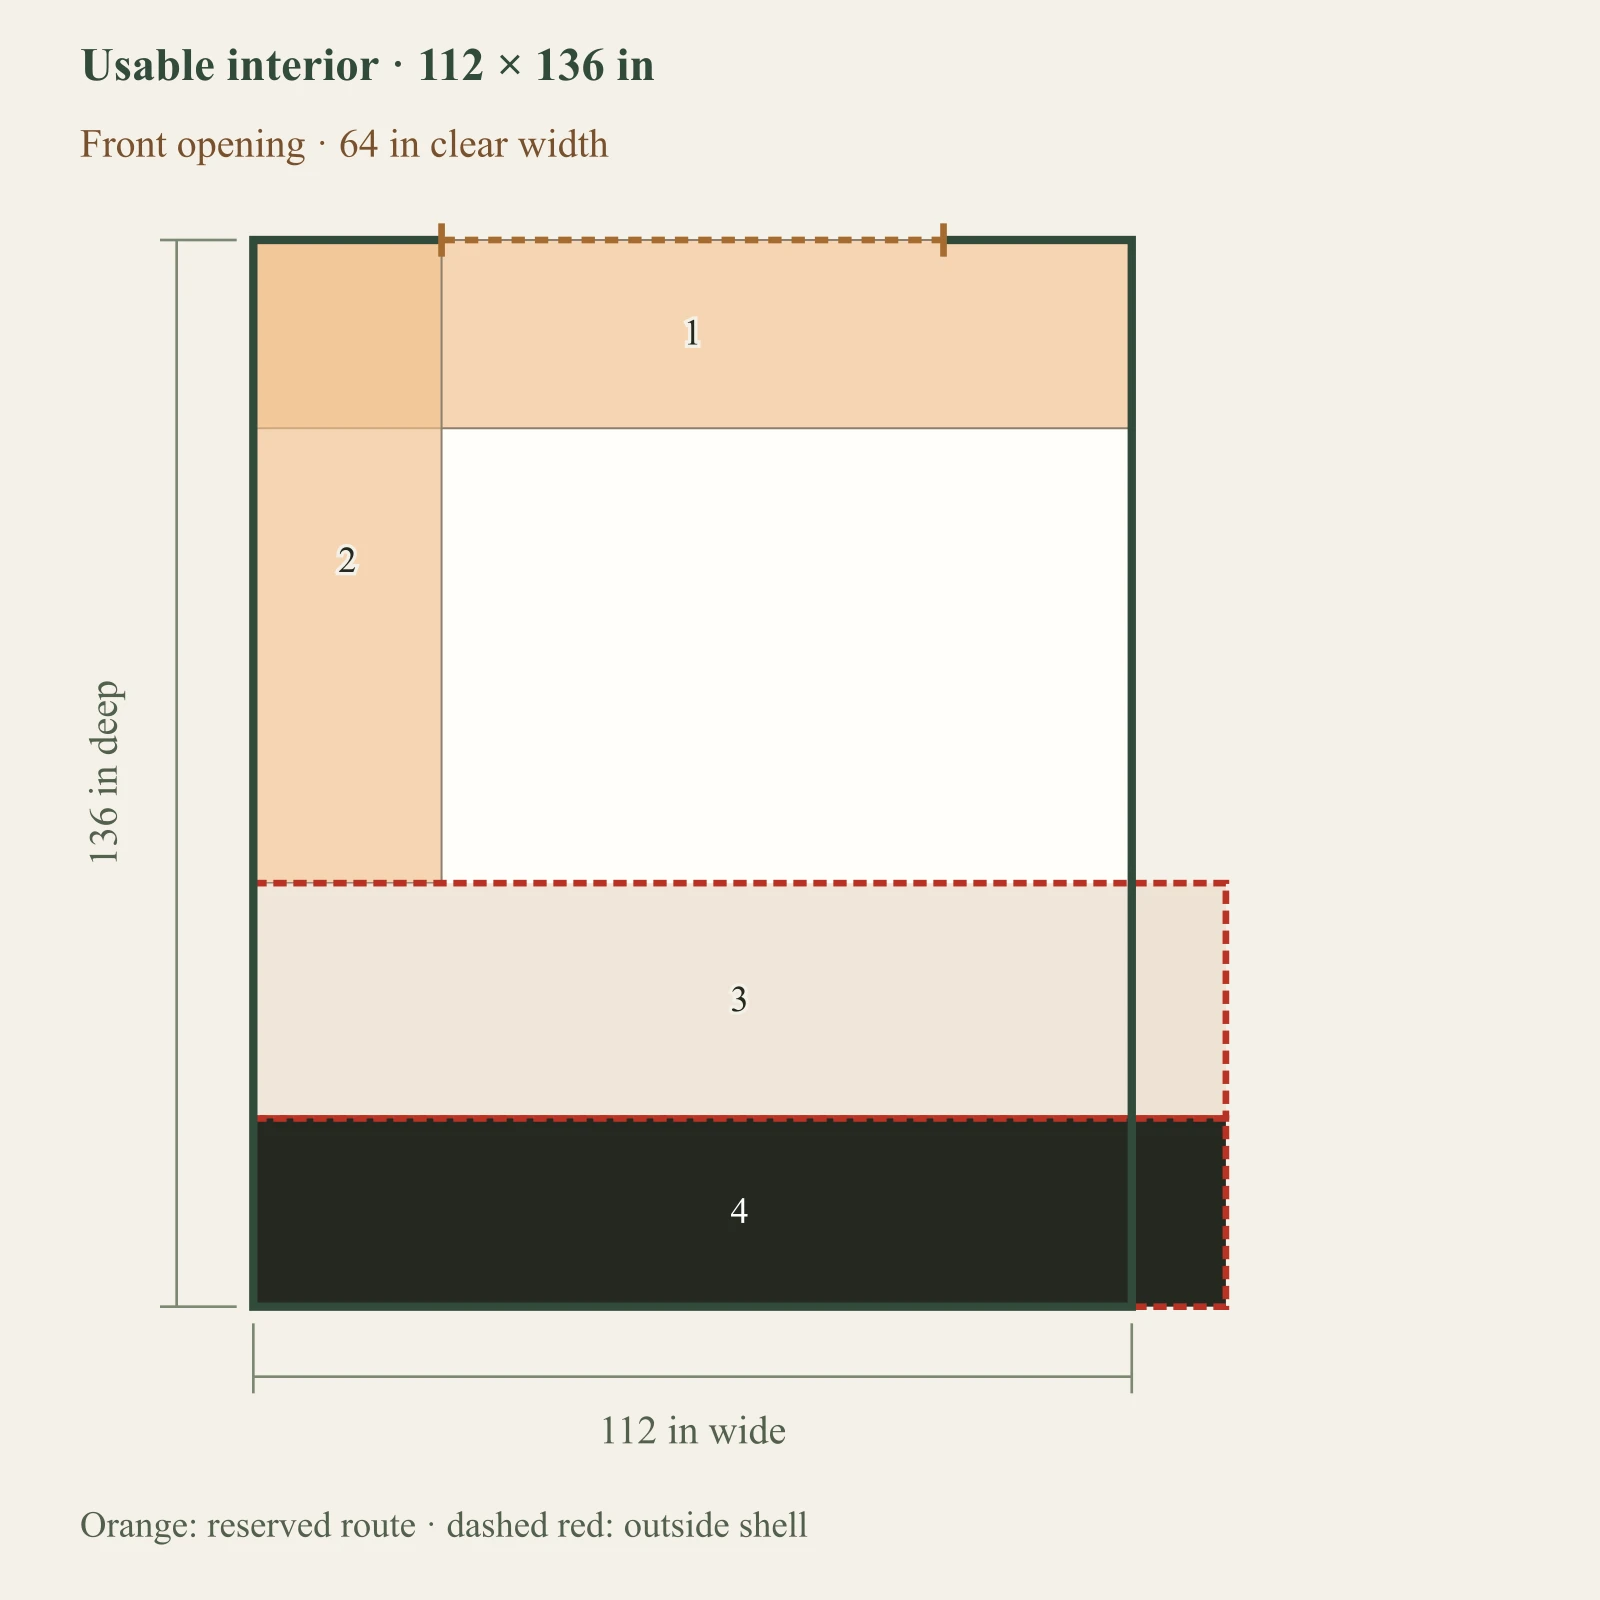
Full-size layout and reserved spacesFull-size footprints with a 24 in entry/side aisle and 30 in bench standing depth. Each mobile deployment and its orthogonal routes are tested with other parked positions unchanged. Staging is screened along the lengthwise axis; turning, actual machine feed points and manufacturer operating instructions require separate confirmation. Objects outside the outlined shell have not been placed. Numbers refer to the object list. This is a planning diagram, not a construction drawing.Reserved entry cross-aisle: 112 × 24 in at 0, 0 inReserved side aisle: 24 × 82 in at 0, 0 inBench standing area: 60 × 30 in at 26, 82 inWorkbench: 60 × 24 in at 26, 112 in1234Usable interior · 112 × 136 inFront opening · 64 in clear width112 in wide136 in deepOrange: reserved route · dashed red: outside shell
Object dimensions & enlarged view

Inspect the layout

100%

Dimensions in inches. Zoom changes the view, not your measurements. Select an object to identify its footprint, then swipe or scroll within the drawing. With a keyboard, focus the drawing and use arrow keys.

Input-based planning only. Turning, ramps, thresholds, wall mounting and structural capacity are not approved by this diagram. Escape or Close returns to the page.

  • 1. Reserved entry cross-aisle: 112 × 24 in
  • 2. Reserved side aisle: 24 × 82 in
  • 3. Bench standing area: 60 × 30 in
  • 4. Workbench: 60 × 24 in

Shown geometry passes

A failed arrangement is not proof that every layout in this size fails. Only the displayed axis-aligned arrangements were tested.

12×16

Interior 136 × 184 in; door 72 in.

Full-size layout and reserved spacesFull-size footprints with a 24 in entry/side aisle and 30 in bench standing depth. Each mobile deployment and its orthogonal routes are tested with other parked positions unchanged. Staging is screened along the lengthwise axis; turning, actual machine feed points and manufacturer operating instructions require separate confirmation. Objects outside the outlined shell have not been placed. Numbers refer to the object list. This is a planning diagram, not a construction drawing.Reserved entry cross-aisle: 136 × 24 in at 0, 0 inReserved side aisle: 24 × 130 in at 0, 0 inBench standing area: 60 × 30 in at 38, 130 inWorkbench: 60 × 24 in at 38, 160 in1234Usable interior · 136 × 184 inFront opening · 72 in clear width136 in wide184 in deepOrange: reserved route · dashed red: outside shell
Object dimensions & enlarged view

Inspect the layout

100%

Dimensions in inches. Zoom changes the view, not your measurements. Select an object to identify its footprint, then swipe or scroll within the drawing. With a keyboard, focus the drawing and use arrow keys.

Input-based planning only. Turning, ramps, thresholds, wall mounting and structural capacity are not approved by this diagram. Escape or Close returns to the page.

  • 1. Reserved entry cross-aisle: 136 × 24 in
  • 2. Reserved side aisle: 24 × 130 in
  • 3. Bench standing area: 60 × 30 in
  • 4. Workbench: 60 × 24 in

Shown geometry passes

A failed arrangement is not proof that every layout in this size fails. Only the displayed axis-aligned arrangements were tested.

Change one measurement

Find the condition that changes the answer.

Start with a deliberately failing example, then restore the reference or try your own value. Only workbench length changes; the other equipment, allowances and shed dimensions stay fixed.

This experiment is separate from your saved project. Its inputs are planning assumptions, not a product specification or a universal threshold.

This tested arrangement has unresolved geometry conflicts.

  • Bench standing area exceeds the usable interior in this arrangement.
  • Workbench exceeds the usable interior in this arrangement.

A bench that exceeds the rear wall needs a shorter bench or a wider usable interior. Extra shed depth alone does not extend that wall.

Full-size layout and reserved spacesFull-size footprints with a 24 in entry/side aisle and 30 in bench standing depth. Each mobile deployment and its orthogonal routes are tested with other parked positions unchanged. Staging is screened along the lengthwise axis; turning, actual machine feed points and manufacturer operating instructions require separate confirmation. Objects outside the outlined shell have not been placed. Numbers refer to the object list. This is a planning diagram, not a construction drawing.Reserved entry cross-aisle: 112 × 24 in at 0, 0 inReserved side aisle: 24 × 82 in at 0, 0 inBench standing area: 124 × 30 in at 0, 82 inWorkbench: 124 × 24 in at 0, 112 in1234Usable interior · 112 × 136 inFront opening · 64 in clear width112 in wide136 in deepOrange: reserved route · dashed red: outside shell

Dark: equipment or storage. Pale areas: activities or zones. Dimensions in inches; scale changes with the view.

  1. 1. Reserved entry cross-aisle: 112 × 24 in
  2. 2. Reserved side aisle: 24 × 82 in
  3. 3. Bench standing area: 124 × 30 in — outside shell
  4. 4. Workbench: 124 × 24 in — outside shell

Inspect the layout

100%

Dimensions in inches. Zoom changes the view, not your measurements. Select an object to identify its footprint, then swipe or scroll within the drawing. With a keyboard, focus the drawing and use arrow keys.

Input-based planning only. Turning, ramps, thresholds, wall mounting and structural capacity are not approved by this diagram. Escape or Close returns to the page.

See how to measure and revise this requirement
Download the authored reference diagrams

Version 2026-09-08-decisions. These files reproduce the public examples, including failed arrangements. Your private measurements are only included when you generate your own brief.

  • Figure 1 · workshop bench layoutSVGWebP
  • Figure 2 · workshop mobile layoutSVGWebP
  • Figure 3 · workshop permanent layoutSVGWebP
  • Figure 4 · workshop bench 8×10 comparisonSVGWebP
  • Figure 5 · workshop bench 10×12 comparisonSVGWebP
  • Figure 6 · workshop bench 12×16 comparisonSVGWebP
  • Figure 7 · workshop bench boundarySVGWebP

From an example to your measurements

Measure what can change the answer.

Work through these checks before copying a reference into your project. The example allowances are editable planning choices, not universal safety requirements.

01

Bench and standing space

How to measure

Measure the complete bench, including projecting handles. Mark the space you want to stand and move in front of it on your floor.

What it changes

The model reserves the bench and standing zone separately. A longer bench can run out of usable wall before the shed runs out of total area.

If the check fails

Try a shorter bench or a wider usable interior. Reducing standing space changes your requirement; confirm that it still supports the real task.

02

Parked tool versus tool in use

How to measure

Record the tool's parked footprint, then its full working envelope with extensions and the space needed to operate it. Check the actual manufacturer's instructions.

What it changes

A mobile arrangement tests deployment with other fixtures left parked. Storage fit alone does not establish operating fit.

If the check fails

Open the operating-state drawing. Resolve the specific collision by changing the tool position, other fixtures or usable interior; do not treat the parked diagram as approval.

03

Material and entrance

How to measure

Record the longest material, the width of its intended path and the clear door opening. Walk through the real loading sequence.

What it changes

The screen tests a stated staging direction and rectangular routes. It does not simulate carrying or rotating sheet goods or machine-specific feeding.

If the check fails

Separate a door restriction from a staging restriction. A deeper shed may add staging length while leaving the same narrow door and crosswise constraint.

Your next step

Put your measurements to work.

Choose a reference above to start from its exact layout, or continue with the dimensions already in your browser project. The workbench connects equipment, candidate sizes, yard and quote checks to one planning brief.

  • Enter the actual bench dimensions and the working zone you need.
  • List tools or machines that need a permanent footprint.
  • Confirm electrical, ventilation, fire and local building requirements separately.
Review my saved brief

Example layouts stay separate until you adopt one. Changing the active task keeps existing measurements and asks you to review the previous candidate decisions.

Questions to carry into my project

Decision questions

  1. 01What work happens most often?
  2. 02How large is the bench and its working envelope?
  3. 03Which machines need a permanent footprint?
  4. 04Can material move through the work path?
  5. 05When does a larger shell stop being a luxury and become practical?

Change this project?